Learning the clarinet can be a rewarding experience, but it also comes with its challenges, one of which is mastering the clarinet fingering chart. Whether you’re a beginner just starting out or a seasoned player looking to refine your technique, understanding the fingering chart is essential for producing the correct notes and improving your overall performance. In this article, we’ll explore the intricacies of the clarinet fingering chart, how to use it effectively, and some tips to make your learning process smoother.
What is a Clarinet Fingering Chart?
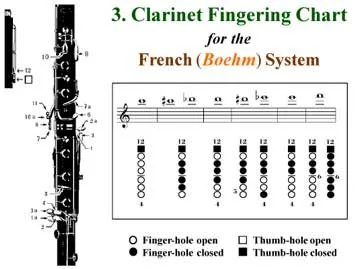
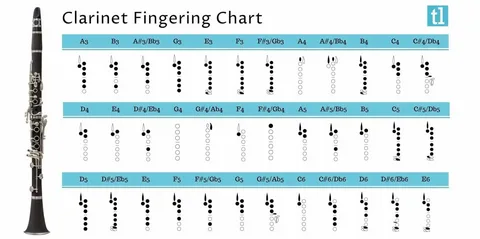
A clarinet fingering chart is a visual representation that shows which keys and holes to cover or press on the clarinet to produce specific notes. Each note on the clarinet corresponds to a particular combination of finger positions, and the chart helps players learn and memorize these positions. The chart typically includes standard fingerings for all notes in the clarinet’s range, from the lowest E to the highest C, and sometimes alternative fingerings as well.

Importance of the Clarinet Fingering Chart
Understanding the clarinet fingering chart is crucial for several reasons:
- Accuracy: Proper fingering ensures that each note sounds as it should, without unintended pitch variations.
- Efficiency: Knowing the correct fingerings allows you to play smoothly and transition between notes without unnecessary movement.
- Technique Development: Mastering the chart helps in developing good finger technique, which is essential for advanced playing.
How to Read a Clarinet Fingering Chart
Reading a clarinet fingering chart may seem daunting at first, but with a little practice, it becomes second nature. Here’s a step-by-step guide to help you get started:
Understanding the Diagram
The chart is usually divided into two sections:
- Upper Joint: The top half represents the keys and holes on the upper joint of the clarinet.
- Lower Joint: The bottom half represents the keys and holes on the lower joint.
Each diagram on the chart shows the clarinet from the perspective of the player, with the mouthpiece at the top. The circles or ovals represent the tone holes, and the blackened circles indicate which holes should be covered.
Identifying the Fingers
- Left Hand: The top section of the chart corresponds to the left hand, with the fingers numbered from 1 to 3 (index to ring) and the thumb (T) used for the register key.
- Right Hand: The bottom section corresponds to the right hand, with fingers also numbered 1 to 3 (index to ring).
- Thumb: The thumb (T) is used for the back register key on the upper joint.
Example: Fingering for Middle C
To play middle C on the clarinet:
- Left Hand: Place your left thumb (T) on the back register key, and cover the first tone hole with your left index finger (1).
- Right Hand: The right-hand fingers do not press any keys for middle C.
This simple combination produces a clear, resonant middle C when played correctly.
Alternative Fingerings
While the standard clarinet fingering chart provides the most common fingerings for each note, there are also alternative fingerings that players can use in specific situations, such as for better intonation, easier transitions between notes, or achieving a different tone quality.
Benefits of Learning Alternative Fingerings
- Improved Intonation: Certain notes may sound sharper or flatter depending on the clarinet and the player’s embouchure. Alternative fingerings can help correct these pitch issues.
- Ease of Play: In fast passages or complex pieces, alternative fingerings can make it easier to transition between notes without compromising speed or accuracy.
- Tone Color Variation: Using different fingerings can produce slight variations in tone, allowing for more expressive playing.

Common Alternative Fingerings
Some common alternative fingerings include:
- Throat Tones: The notes G, G#, A, and Bb in the clarinet’s throat register can be played using different combinations of keys to achieve a better tone.
- Forked F#: In the higher registers, F# can be played using a forked fingering, which can be more convenient in certain musical passages.
- Overblowing: For higher octaves, overblowing (using the same fingering but with increased air pressure and the register key) is often employed to reach notes like high C.
Tips for Mastering the Clarinet Fingering Chart
Practice Regularly
Consistency is key when learning the clarinet fingering chart. Regular practice helps build muscle memory, making it easier to recall fingerings without having to look at the chart. Start with simple scales and gradually work your way up to more complex pieces.
Use a Metronome
Playing with a metronome helps develop a sense of timing and rhythm, which is crucial when transitioning between notes. This is especially helpful when learning alternative fingerings, as it ensures you can switch between them smoothly without disrupting the flow of the music.
Visualize Fingerings
Before playing a piece, take a moment to visualize the fingerings in your mind. This mental rehearsal reinforces your memory and prepares your fingers for the movements required to produce each note.
Start Slow
When learning new fingerings or practicing difficult passages, start at a slow tempo. Focus on accuracy and gradually increase the speed as you become more comfortable with the fingerings.
Record Your Practice Sessions
Recording yourself can be incredibly helpful in identifying areas where you need improvement. Listen to the recordings to check for any pitch inconsistencies or awkward transitions, and adjust your fingering technique accordingly.
Common Challenges and How to Overcome Them
Transitioning Between Registers
One of the most challenging aspects of clarinet playing is transitioning smoothly between the lower and upper registers. The key to mastering this is to practice the register shift, using the clarinet fingering chart to ensure your fingers are in the correct position.
Dealing with “Throat Tones”
Throat tones (G to Bb) are known for being particularly challenging due to their intonation and tone quality. Experimenting with alternative fingerings and adjusting your embouchure can help improve the sound of these notes.
Achieving Consistent Tone
A consistent tone across all registers requires a combination of correct fingerings, breath support, and embouchure control. Use the clarinet fingering chart as a guide, but also pay attention to your breath control and mouth position.
Conclusion
The clarinet fingering chart is an indispensable tool for any clarinet player, whether you’re just starting out or looking to refine your technique. By understanding how to read the chart, practicing regularly, and learning alternative fingerings, you can significantly improve your clarinet playing. Remember, patience and perseverance are key. With consistent practice and a good understanding of the fingering chart, you’ll be able to play with greater accuracy, confidence, and expression.


