When it comes to getting an ear piercing, understanding the ear piercing chart can help you make informed decisions about where to get pierced and what types of piercings are available. Whether you’re considering your first piercing or looking to add more to your collection, knowing about the different ear piercings and their placements can enhance your experience. In this comprehensive guide, we’ll explore everything you need to know about the ear piercing chart, from the basics to the various types of piercings and aftercare tips.
What is an Ear Piercing Chart?
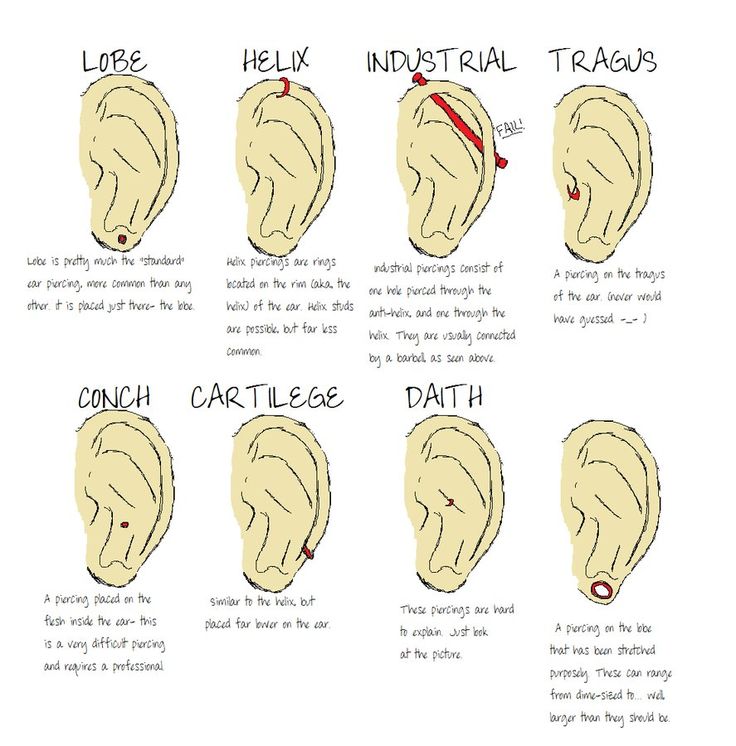
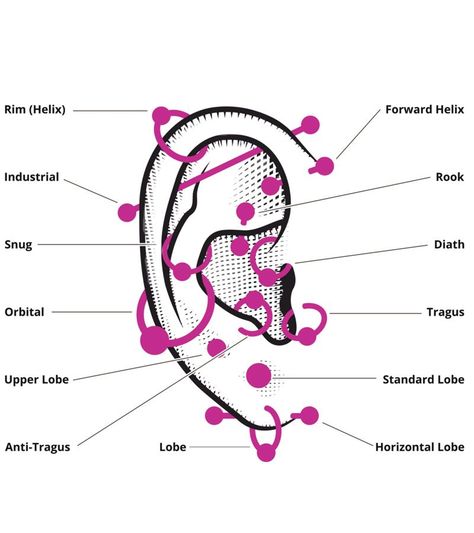
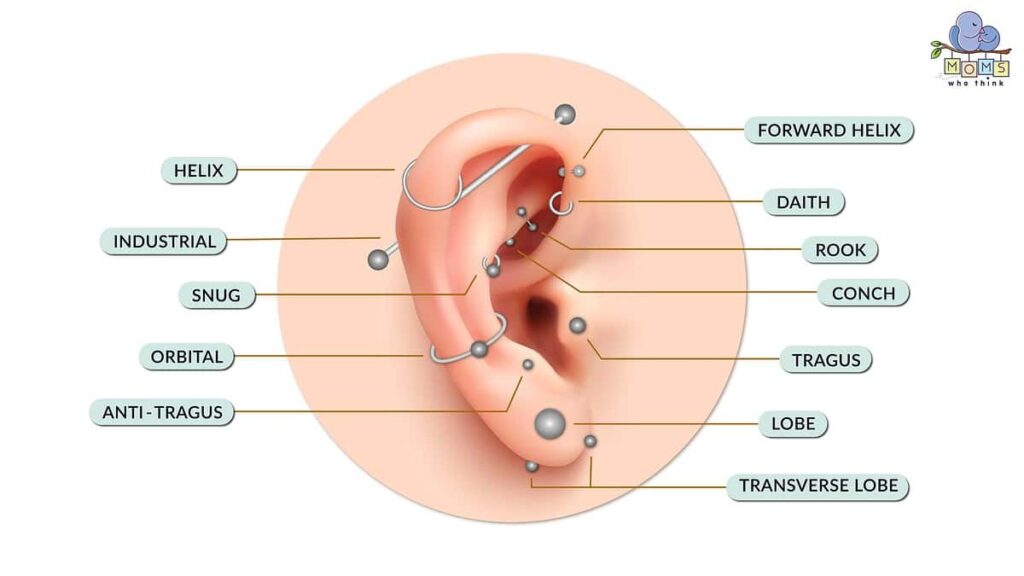
An ear piercing chart is a visual guide that displays the various types of ear piercings and their locations on the ear. It helps you understand the different piercing options available and where each type is typically placed. This chart is useful for planning your piercings, discussing options with a professional piercer, and visualizing how different piercings will look on your ear.
Key Components of an Ear Piercing Chart
- Anatomical Placement: The chart shows the different areas of the ear, such as the lobe, helix, tragus, and more.
- Types of Piercings: It includes various piercing styles and their common names, helping you identify what’s available.
- Healing Time: Many charts also indicate the average healing time for each type of piercing.
Popular Types of Ear Piercings
The ear piercing chart typically includes a variety of piercings. Here’s a breakdown of some of the most popular ones:
1. Earlobe Piercing
- Location: Center of the earlobe.
- Description: The most common and traditional ear piercing. It’s often the first piercing people get.
- Healing Time: Approximately 6-8 weeks.
2. Helix Piercing
- Location: The upper cartilage of the ear.
- Description: A popular cartilage piercing that can be done in various locations along the ear’s rim.
- Healing Time: About 6-12 months.
3. Tragus Piercing
- Location: The small flap of cartilage just in front of the ear canal.
- Description: Known for its unique look and can be a bit more painful due to the thickness of the cartilage.
- Healing Time: Roughly 3-6 months.
4. Conch Piercing
- Location: The inner cartilage of the ear, in the middle of the ear’s bowl.
- Description: Can be either inner or outer conch. It’s a bold choice that stands out.
- Healing Time: 6-12 months.
5. Daith Piercing
- Location: The small fold of cartilage just above the ear canal.
- Description: Often chosen for its aesthetic appeal and potential health benefits, like migraine relief.
- Healing Time: 6-12 months.
6. Industrial Piercing
- Location: A double piercing that spans across the upper cartilage of the ear, connected by a single barbell.
- Description: A striking and edgy look that requires careful placement.
- Healing Time: 6-12 months.
How to Use an Ear Piercing Chart

Using an ear piercing chart effectively involves several steps:
1. Identify Your Ear Anatomy
Familiarize yourself with the different parts of the ear as shown on the chart. Understanding where each piercing is located can help you decide which ones you might want.
2. Choose Your Piercings
Review the types of piercings and their placements. Consider factors like healing time, pain level, and how the piercing will fit with your personal style.
3. Consult with a Professional
Bring the ear piercing chart to a professional piercer. They can provide advice on the best options based on your anatomy and preferences, and help you understand what to expect.
4. Plan for Aftercare
Each type of piercing has its own aftercare requirements. Use the chart to identify which piercings you are considering and follow the recommended aftercare procedures to ensure proper healing.
Aftercare for Ear Piercings
Proper aftercare is essential for all types of ear piercings to prevent infections and promote healing. Here are some general aftercare tips:
1. Keep the Piercing Clean
Clean the area around the piercing with a saline solution or an antiseptic recommended by your piercer. Avoid using alcohol or hydrogen peroxide, as these can irritate the piercing.
2. Avoid Touching
Refrain from touching your piercing with dirty hands. This reduces the risk of introducing bacteria to the wound.
3. Be Cautious with Hair and Accessories
Keep hair away from the piercing site and avoid wearing earrings or accessories that could irritate or snag the piercing.
4. Monitor for Signs of Infection
Watch for signs of infection, such as excessive redness, swelling, or discharge. If you notice any of these symptoms, contact your piercer or a healthcare professional.
Common Questions About Ear Piercing Charts
1. How Do I Choose the Right Piercing for Me?
Consider factors like pain tolerance, healing time, and how the piercing fits with your personal style. Consulting a professional piercer can also help you make an informed decision.
2. Can I Get Multiple Piercings at Once?
Yes, many people opt for multiple piercings. However, it’s important to consider the healing time and aftercare for each piercing to avoid complications.
3. What Should I Do If My Piercing Gets Infected?
If you suspect an infection, keep the area clean and avoid removing the jewelry. Seek advice from your piercer or a medical professional to address the issue promptly.

Conclusion
Understanding the ear piercing chart is essential for anyone considering ear piercings. By familiarizing yourself with the different types of piercings, their locations, and the associated aftercare, you can make well-informed decisions that enhance your personal style while ensuring a smooth healing process. Whether you’re getting your first piercing or adding to your collection, knowing how to read and use the ear piercing chart will help you achieve the best results.


